Before any fusion cycle begins, a well-prepared checklist is the difference between a reliable joint and a costly failure. In butt fusion welding, precision matters at every stage: machine setup, pipe preparation, temperature control, alignment, and cooling time all directly affect the final bond. When operators follow a clear pre-operation checklist, they reduce the risk of weak welds, unnecessary rework, and project delays. This is especially important in water supply, gas distribution, mining, and industrial pipeline installations, where joint integrity has a direct impact on safety and long-term performance.
For contractors, site supervisors, and technicians, the checklist is not just a formality. It is a practical workflow that helps ensure every butt fusion machine is ready for accurate operation. Whether you are using a manual, hydraulic, or CNC automatic system, the same principle applies: verify everything before heat and pressure are applied. A disciplined pre-operation routine also helps teams maintain consistent welding quality across different crews and job sites.
In many real-world projects, failures happen not because the machine is poor, but because the setup was incomplete. A dirty pipe face, an unstable power supply, a misaligned clamp, or an incorrect temperature setting can all produce a poor weld. That is why operators should treat the checklist as a mandatory step. It protects the investment in equipment, saves time, and supports the durability of the pipeline itself.
1. Confirm the Work Area Is Safe and Ready
Before bringing the machine into operation, inspect the entire work area. The site should be level, stable, clean, and free from unnecessary obstructions. Operators need enough space to move pipe sections safely and access the machine from both sides. Poor site organization can make pipe handling difficult and increase the chance of contamination.
Important: A safe work zone is not only about protecting workers. It also helps keep the pipe ends clean and properly aligned during the fusion process.
Check for weather conditions as well. Strong wind, rain, dust, or extreme cold can affect heating performance and joint quality. If the environment is unstable, use protective covers or a controlled workspace when possible. For outdoor pipeline work, these small adjustments make a major difference in weld consistency.
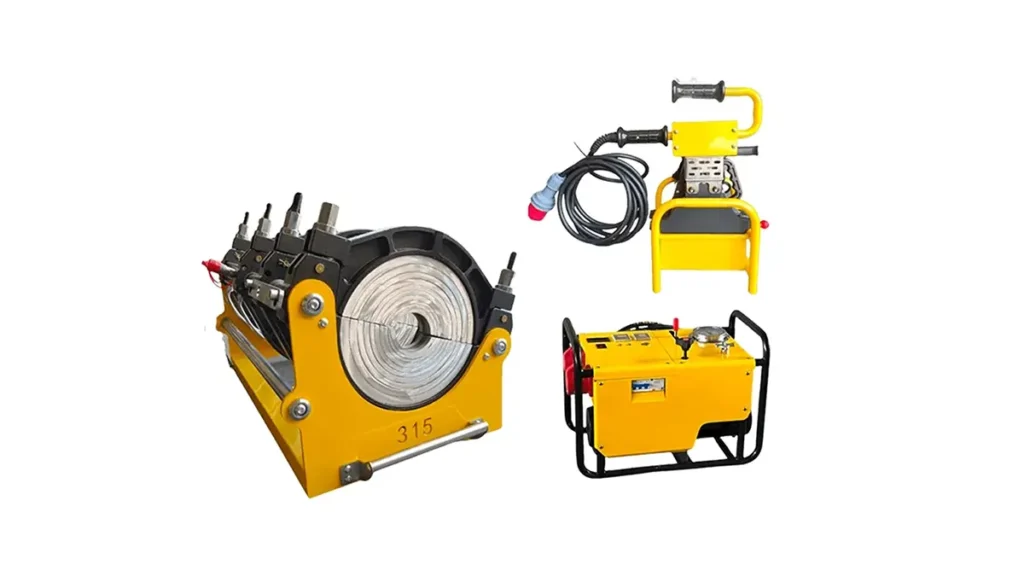
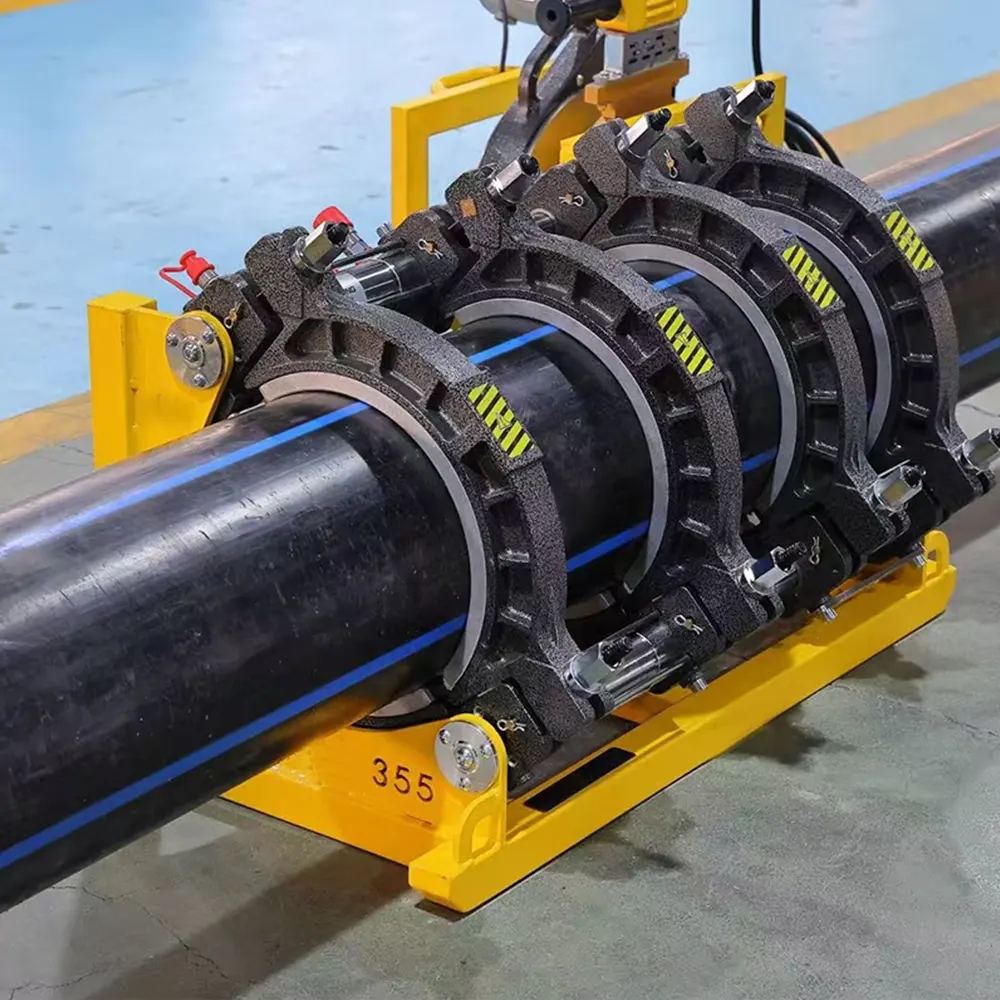
2. Inspect the Machine Body and Main Components
Start with a visual inspection of the butt fusion machine itself. Look for damage on the frame, clamps, hydraulic system, electrical connections, heater plate, and facer. All moving parts should operate smoothly without unusual noise or resistance. If the machine shows signs of wear, oil leakage, loose fasteners, or damaged cables, it should not be used until the issue is fixed.
For hydraulic models, check oil level and pressure stability. For manual units, confirm that the clamp movement is firm and precise. For CNC automatic systems, verify the control interface and program settings. The machine should be fully functional before any pipe is loaded.
Reliable manufacturers emphasize this step because precision equipment depends on precise maintenance. Companies with strong production standards, such as JQ-Fusion, build machines for stable performance, but even the best equipment requires daily inspection before use.
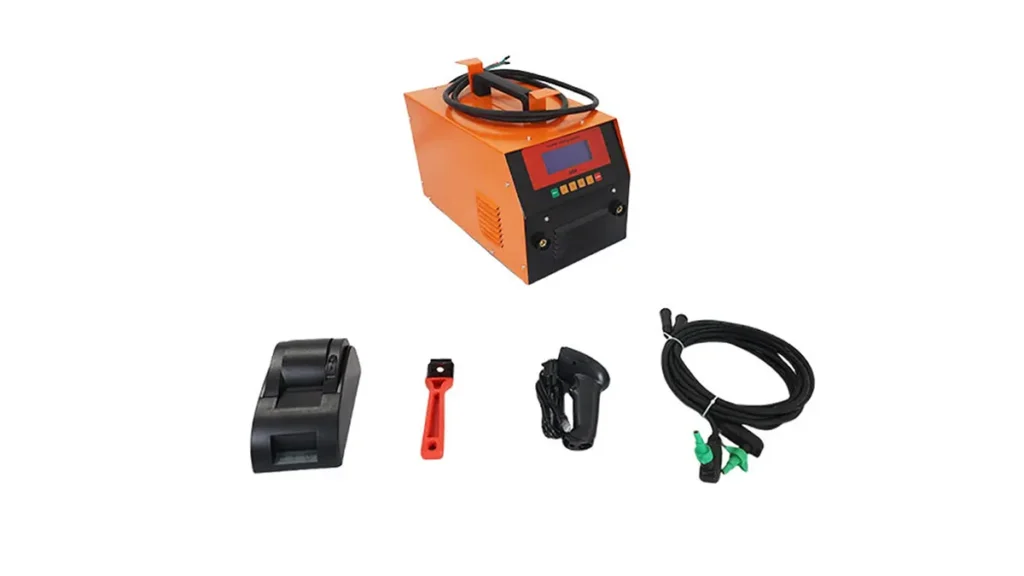
3. Verify Power Supply and Control Settings
Electric heating is central to butt fusion welding, so power supply inspection is critical. Confirm the voltage matches the machine specification and that the extension cables, plugs, and sockets are in good condition. A weak or unstable power source can cause temperature fluctuation, leading to uneven heating and weak fusion.
Check the control panel or temperature controller before startup. The heater plate must reach the recommended welding temperature and maintain it steadily. Avoid relying on assumptions. Always use the machine’s indicator, controller, or calibrated thermometer to verify accuracy.
When operating a professional welding system, temperature accuracy is one of the most important quality factors. Even a small deviation may affect bead formation and the strength of the final joint.
4. Clean and Prepare the Pipe Ends
Pipe preparation is one of the most important parts of the checklist. The pipe ends must be clean, dry, and free from dust, grease, mud, moisture, and oxidation. Before placing the pipe into the clamps, wipe the surfaces carefully and inspect for any visible damage.
Use the facer to trim the pipe ends and create smooth, parallel surfaces. This step ensures both sides meet evenly during fusion. If the pipe ends are not properly faced, the joint may contain gaps or uneven pressure points. That can lead to poor bonding and reduced service life.
Always store pipe materials in a clean area before welding. If the pipes were transported across a dusty or wet site, clean them again immediately before use. Good pipe hygiene is essential for strong fusion results.
5. Check Pipe Diameter, Material, and Compatibility
Not every pipe can be welded with the same setup. Confirm that the pipe diameter, wall thickness, and material grade match the machine’s operating range and the project specification. Butt fusion is commonly used for HDPE pipe systems, but the machine and parameters must still be selected correctly for the exact job.
Before starting, compare the pipe data with the machine manual or project welding chart. This helps determine correct pressure, heating time, cooling time, and clamp positioning. Using incorrect parameters can create a joint that looks acceptable on the outside but fails under long-term load.
For large pipeline projects, technical teams often record material batch numbers and welding settings for traceability. This practice supports quality control and makes future inspection easier.
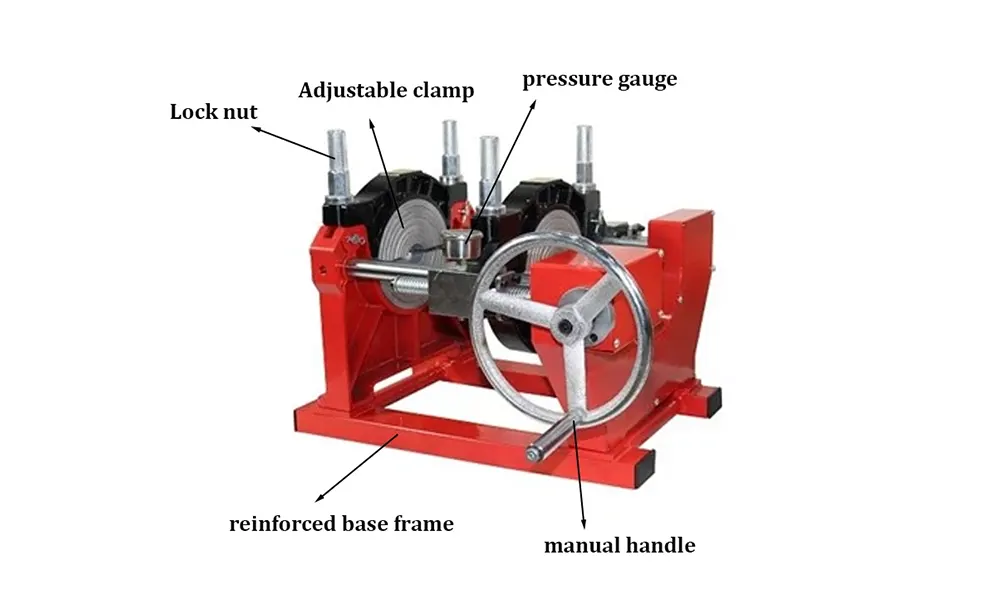
6. Inspect Alignment and Clamping Accuracy
Accurate alignment is essential for a successful weld. Once the pipes are positioned in the clamps, check whether both ends are centered and level. The pipe axis should be aligned without offset, bend, or uneven pressure. Even small misalignment can create stress concentration in the weld area.
Clamp pressure should be secure but not excessive. The pipes must remain stable throughout facing, heating, and joining. If the clamps are worn or dirty, clean them before use and confirm the holding surfaces are in good condition.
Key point: Alignment should be checked more than once—before facing, after facing, and again before the heating plate is inserted.
7. Confirm the Heater Plate Is Clean and Calibrated
The heater plate is one of the most sensitive parts of the fusion process. It must be clean, undamaged, and properly coated if required. Any dirt, melted plastic residue, or surface contamination can transfer to the pipe ends and weaken the weld.
Before operation, inspect the heater for scratches, uneven heating zones, or temperature inconsistency. If the machine uses a temperature controller, check calibration status and verify the set point. A heater that is too cool may not soften the pipe enough, while overheating can degrade the polymer structure.
As part of professional machine design, quality manufacturers test temperature accuracy and heating stability before delivery. This is one reason buyers prefer suppliers with strong production control and documented inspection processes.
8. Prepare the Facer, Tools, and Accessories
The facer must rotate smoothly and produce clean shavings. Check the blades for sharpness and wear. Dull blades can leave an uneven surface, which affects fusion quality. Make sure all tools needed for the operation are present, including measuring devices, cleaning cloths, markers, and protective gear.
Accessory readiness is often overlooked, but missing tools can interrupt the workflow and force operators to stop midway through preparation. A complete checklist should also include emergency tools, spare parts, and basic maintenance items such as grease or replacement blades.
On large job sites, teams often organize tools by welding station to reduce confusion. This simple habit supports efficiency and prevents delays between pipe preparation and joining.
9. Review Welding Parameters Before Starting
Every pipe job should have the correct welding parameters recorded before operation begins. Review heating time, changeover time, joining pressure, bead formation, and cooling duration. These values vary depending on pipe diameter, wall thickness, and material grade.
Operators should not guess settings based on memory alone. Use the approved parameter chart provided by the machine manufacturer or project engineer. This is especially important in automated welding systems, where programming errors can repeat the same mistake across multiple joints.
Stable welding performance depends on repeatable control. That is why manufacturers offering advanced butt fusion solutions often provide detailed technical guidance and machine training for different project types.
10. Make Sure Safety Equipment Is Available
Before operation, confirm that the necessary protective equipment is available and being used. This includes gloves, safety glasses, protective clothing, and footwear suitable for industrial work. In some environments, hearing protection and respiratory protection may also be required.
Safety is not separate from welding quality. When workers are protected and comfortable, they can focus better on each step of the process. This reduces human error and supports more consistent work on site.
A good checklist always combines equipment readiness with worker safety. Reliable output begins with safe operation.
11. Test the Machine Function Before Production Welding
Once all components are checked, run a functional test without beginning a full welding cycle. Confirm clamp movement, facer rotation, heater response, and hydraulic pressure if applicable. Listen for abnormal sounds and observe whether the machine responds as expected.
If anything seems inconsistent, stop and correct the issue before production welding starts. A short test at the beginning can prevent a much larger problem later. This is especially useful on large projects where many welds must be completed in sequence.
Good technical support from the supplier also matters here. A responsive manufacturer can help troubleshoot startup problems quickly, minimizing downtime on the project.
12. Record the Setup and Inspection Results
Professional welding teams should document pre-operation checks. Recording machine model, pipe size, material, temperature setting, operator name, and inspection results creates traceability for the project. If a later issue arises, the team can review the setup history and identify possible causes.
Documentation also helps with quality audits and customer reporting. For contractors handling international projects, this recordkeeping can improve compliance and support stronger project management.
When working with experienced suppliers such as JQ-Fusion, documentation often becomes part of a broader quality assurance system. This is especially useful for customers who need reliable support, OEM or ODM customization, and consistent results across multiple sites.
13. Common Mistakes to Avoid Before Operation
Several errors appear repeatedly in butt fusion welding. One common issue is starting work before the heater reaches the correct temperature. Another is failing to clean pipe ends thoroughly. Some operators also rush the alignment process or ignore small mechanical faults because they appear minor at first.
Other mistakes include using incorrect parameters, skipping calibration checks, and allowing contamination onto the prepared pipe face. Each of these problems can reduce weld quality and shorten the service life of the pipeline.
Discipline in pre-operation preparation is one of the easiest ways to improve results. A strong checklist makes this discipline repeatable across different teams and shifts.
14. Why a Checklist Improves Project Efficiency
A well-structured checklist does more than prevent mistakes. It also improves efficiency. Teams spend less time fixing errors, replacing failed joints, or investigating quality problems. That means more welds can be completed correctly the first time.
For large pipeline contractors, this efficiency can significantly reduce cost and schedule pressure. It also builds trust with clients who expect durable, high-performance welds. In practical terms, the checklist becomes a tool for both quality assurance and project delivery.
Manufacturers with strong factory capability and large inventory support these goals by providing dependable equipment, fast delivery, and technical guidance. When the machine and the checklist work together, the whole welding workflow becomes more reliable.
15. Final Pre-Operation Checklist Summary
Before you begin butt fusion welding, confirm that the site is safe, the machine is clean and functional, the power supply is stable, the pipe ends are properly prepared, and the settings match the project requirements. Check alignment, heater condition, tooling, safety equipment, and documentation. These actions may seem simple, but they are the foundation of every successful fusion joint.
Final reminder: A good weld starts long before the heater touches the pipe. The pre-operation checklist is where quality begins.
Frequently Asked Questions
What is the most important step before starting butt fusion welding?
The most important step is ensuring the pipe ends, machine, and heater are all properly prepared and verified. Clean surfaces, correct alignment, and accurate temperature settings are essential for a strong joint.
Why does heater temperature matter so much?
Heater temperature controls how evenly the pipe material softens. If the temperature is too low or too high, the fusion bond may be weak, inconsistent, or damaged.
Can I skip the checklist if the machine has been used before?
No. Even a previously used machine must be inspected before each operation. Site conditions, pipe materials, and settings can change from one job to another.
How often should alignment be checked?
Alignment should be checked at several points: before facing, after facing, and again before heating. Rechecking helps prevent offset and ensures a stable weld.
What does a good supplier add to the welding process?
A strong supplier provides reliable equipment, clear technical guidance, quality control, customization options, and after-sales support. This helps teams work with confidence and consistency on global projects.