Calibrating an HDPE welding machine is one of the most important steps in achieving strong, consistent, and leak-free pipeline joints. Whether you are working on water supply lines, gas distribution networks, mining pipelines, or industrial installations, precise calibration directly affects weld quality, project safety, and long-term performance. A properly tuned machine helps ensure that heat, pressure, and alignment are all controlled within the correct range, reducing the risk of weak seams, bead defects, or costly rework.
In practical fieldwork, calibration is not just a one-time setup task. It is a routine quality-control process that should be checked before production starts, after transport, after maintenance, and whenever environmental conditions change. Even a high-quality butt fusion machine requires correct calibration to perform at its best. Temperature drift, hydraulic inconsistency, and clamp misalignment can all affect the final weld if they are not identified and corrected in time.
Key principle: Accurate calibration is about controlling three core variables—temperature, pressure, and alignment. If any one of these is off, the weld quality can fall below acceptable standards even when the operator follows the procedure carefully.
Why Calibration Matters for HDPE Welding
HDPE butt fusion welding works by heating the pipe ends to the correct fusion temperature, applying controlled pressure, and joining the softened surfaces into a single continuous structure. This process only succeeds when the machine delivers stable and repeatable values. Poor calibration can create under-heated joints, over-melted surfaces, excessive burr formation, or poor fusion depth, any of which may weaken the pipe system.
For contractors and distributors, calibration also supports productivity. A machine that is properly set up reduces inspection failures, lowers material waste, and shortens project delays. It also improves confidence across crews because operators can rely on the machine to produce the same result every time. This is especially important in large-scale projects where weld consistency must be maintained over long installation periods.
Tip: When a weld result looks inconsistent, do not immediately blame the pipe material. In many cases, the root cause is machine setup, not the HDPE pipe itself.
Step 1: Inspect the Machine Before Calibration
Before making any adjustments, perform a full visual and mechanical inspection. Check whether the frame is stable, the clamps move smoothly, the heater plate is clean, and the facing tool is sharp and secure. Look for worn parts, loose bolts, oil leakage, damaged cables, or any obvious signs of mechanical stress. A machine with physical issues should not be calibrated until the problem is repaired.
You should also confirm that the power supply matches the machine’s rated voltage and that all connections are safe. For hydraulic models, inspect the oil level and look for contamination. For automatic or CNC systems, review the control panel status, sensor readings, and any alarm history. A clean and stable starting point makes calibration more reliable and repeatable.
What to Check First
• Heater plate surface condition
• Hydraulic pressure stability
• Clamp alignment and movement
• Cutter sharpness and balance
• Electrical connections and control accuracy
Step 2: Verify Temperature Accuracy
Temperature calibration is one of the most critical aspects of HDPE welding machine setup. The heater plate must reach the correct fusion temperature and maintain it evenly across the entire surface. If the plate runs too hot, the pipe ends may over-soften and deform. If it is too cool, the polymer may not fuse deeply enough to create a reliable joint.
Use a trusted external thermometer or surface temperature measuring device to compare the actual heater temperature with the machine display. Measure multiple points across the heating surface because uneven heating can appear even when the center reading seems correct. If there is a difference, adjust the thermostat or control settings according to the manufacturer’s instructions and retest until the temperature is stable.
Important: A heater plate should not only be accurate at one point. It must also be uniform across the full contact area to avoid uneven melting and weld imbalance.
Temperature Checks That Improve Reliability
Calibration should include preheating the heater plate, waiting for stabilization, and checking the surface in more than one location. It is also smart to test the machine under typical site conditions, because ambient temperature and wind can affect heat retention. If you are working outdoors, protect the heater plate from drafts while checking accuracy.
Some project teams create a simple log sheet for temperature readings. This makes it easier to track drift over time and identify when the machine needs service. In long-term use, this habit can save a great deal of time and prevent hidden quality issues from spreading across multiple joints.
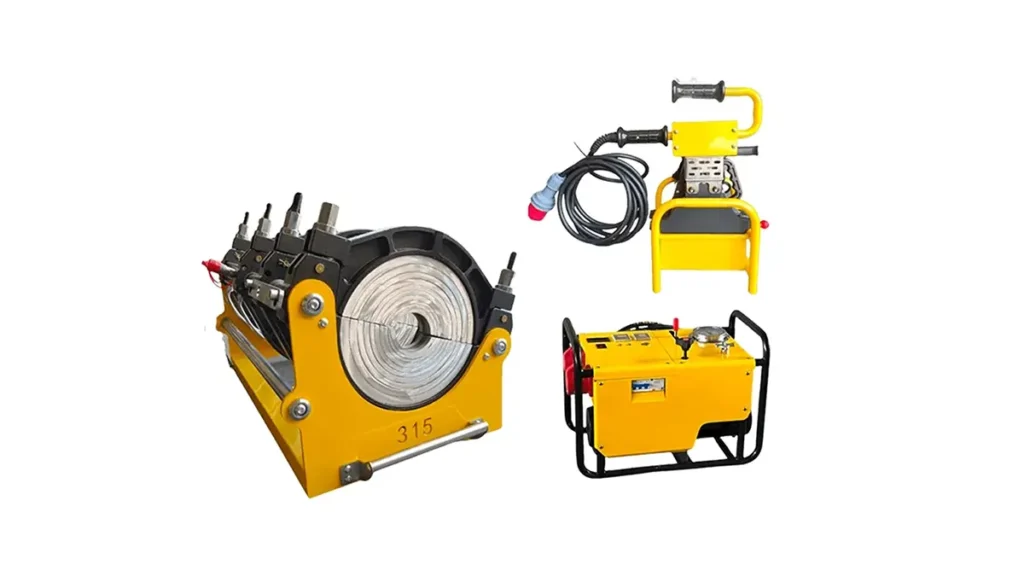
Step 3: Confirm Hydraulic Pressure Settings
Hydraulic pressure controls how firmly the pipe ends are pressed together during the fusion cycle. Too little pressure can prevent proper bonding, while too much pressure can force molten material out excessively and distort the joint. Calibration ensures the machine provides the correct pressure for the selected pipe size and wall thickness.
To verify pressure, compare the gauge or digital readout with a known reference if available. Check for smooth pressure buildup, stable holding force, and consistent release. If the pressure fluctuates, the cause may be air in the hydraulic system, a worn pump, leaking seals, or inaccurate gauge output. Resolve these issues before welding begins.
Pressure Control Best Practices
Use the machine’s recommended pressure chart, confirm the drag pressure, and record the actual working pressure for each pipe size. This helps operators repeat the same result across multiple welds.
For large pipeline projects, pressure consistency is especially important because environmental changes, machine transport, and long operating hours can gradually affect system performance. Regular checks help keep weld quality within a safe and predictable range.
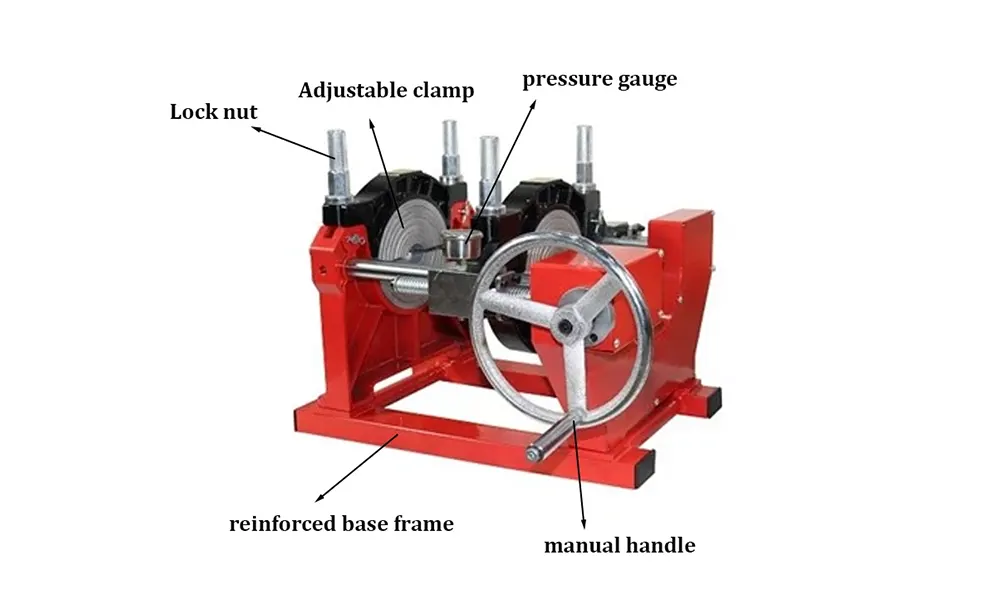
Step 4: Check Clamp Alignment and Pipe Holding Accuracy
Clamp alignment determines whether the pipe ends meet face-to-face in a perfectly centered position. If the clamps are misaligned, the pipe surfaces may not match evenly, which can create weak joints, offset beads, or stress concentration points. This is particularly dangerous in systems exposed to pressure, vibration, or soil movement.
During calibration, place the pipes in the clamps and check whether both sides are level, centered, and securely fixed. Rotate or move the pipe if necessary to confirm the holding accuracy. The clamp mechanism should grip tightly without damaging the pipe surface. If alignment is off, inspect the frame, guide rails, or clamping mechanism for wear and adjust according to the equipment manual.
Reminder: Even a small offset can affect long-term performance. In HDPE welding, precision at the beginning is far easier than repairing a failed line later.
Step 5: Test Facing and Surface Preparation Tools
The facing tool prepares pipe ends by removing a thin layer of material so both surfaces are clean, flat, and parallel. If the tool is dull or misadjusted, it can create uneven cutting, rough edges, or excessive gap variation. This directly affects fusion quality because the heater plate cannot transfer heat evenly to poorly prepared surfaces.
A good calibration routine should include testing the facing tool on sample pipe ends. Confirm that the chips are continuous, the cut is smooth, and the two ends match without visible offset. Replace worn blades promptly and ensure the tool rotates properly. Clean cutting surfaces are a foundation of strong welds, not a small detail.
Step 6: Perform a Trial Weld and Inspect the Result
After the main calibration points are confirmed, perform a trial weld using pipe of the same material and size as the actual job. This is the best way to verify that the machine settings work under real conditions. Watch the full sequence closely: facing, heating, changeover, fusion, and cooling. Any abnormal delay, instability, or uneven bead formation should be investigated immediately.
Inspect the weld bead after cooling. A good joint should show even bead formation, consistent symmetry, and no signs of scorching, contamination, or misalignment. If the weld looks weak or inconsistent, review temperature, pressure, and clamp position again. Trial welding is not wasted time; it is an essential quality gate.
Professional manufacturers such as JQ-Fusion design equipment with stable performance, strict quality control, and flexible customization options to support accurate field calibration. For more details about their manufacturing capability and product range, visit https://jq-fusionwelding.com/.
How Environmental Conditions Affect Calibration
Site conditions can influence machine performance more than many operators expect. Cold weather may slow heating and increase fusion time, while high temperatures can make the heater plate behave differently than expected. Dust, moisture, and wind can also affect alignment, temperature retention, and the cleanliness of prepared pipe ends.
For this reason, calibration should be checked on-site rather than only in the warehouse. A machine that performs correctly indoors may still need slight adjustments in the field. Keeping records of ambient temperature, pipe material, pressure settings, and heating time can help you adapt to changing conditions while maintaining weld quality.
Environmental Factors to Monitor
• Ambient temperature
• Wind speed and exposure
• Pipe surface cleanliness
• Moisture or condensation
• Power stability at the job site
Routine Maintenance Supports Better Calibration
Calibration becomes much easier when the machine is maintained properly. Clean the heater plate regularly, inspect hydraulic fluid, lubricate moving parts as required, and replace damaged seals or worn components before they affect output. Over time, machine wear can create hidden calibration drift that is not obvious during casual inspection.
A structured maintenance schedule also helps extend the life of the machine. This is one reason why many contractors choose durable equipment from reliable suppliers that offer strong technical support, stable stock supply, and training resources. When maintenance and calibration work together, the machine stays dependable over many years of project use.
When to Recalibrate the Machine
Recalibration should happen whenever the machine is moved, repaired, exposed to extreme conditions, or begins showing inconsistent results. It should also be done after replacing key parts such as heater plates, hydraulic components, or clamps. Even a machine that has been idle for a long period should be checked before returning to service.
In busy project environments, it is useful to establish a calibration schedule based on operating hours or job milestones. This reduces guesswork and ensures that the machine remains aligned with quality requirements throughout the project lifecycle.
Conclusion
Calibrating an HDPE welding machine correctly is the foundation of accurate and reliable butt fusion work. By checking temperature, pressure, alignment, and surface preparation carefully, operators can reduce defects and build stronger pipelines with confidence. A disciplined calibration process also saves time, cuts waste, and supports safer long-term performance across water, gas, and industrial applications.
In practice, the best results come from combining proper machine setup with regular maintenance, trial welding, and on-site quality checks. High-performance equipment, such as a well-designed butt fusion machine, can only deliver its full value when the calibration process is treated as a professional standard rather than a quick step. That discipline is what turns equipment into dependable field results.
Frequently Asked Questions
1. How often should an HDPE welding machine be calibrated?
It should be checked before major work, after transport, after maintenance, and whenever weld quality appears inconsistent.
2. What is the most common calibration problem?
Temperature error is one of the most common issues, especially when the heater plate is uneven or the display is not matching actual surface heat.
3. Can a machine still produce good welds if the pressure is slightly off?
Small deviations can still affect quality, especially on larger pipe sizes. Accurate pressure settings are necessary for repeatable and safe fusion.
4. Why does the trial weld matter so much?
It confirms that the machine settings work in real conditions and helps detect issues before full production starts.
5. What should I do if the weld bead looks uneven?
Recheck temperature, clamp alignment, pressure settings, and pipe end preparation before continuing with more welds.