Setting up a pipe fusion machine correctly is the foundation of a strong, leak-free pipe joint. Whether you are working on a water supply line, a gas distribution system, or an industrial pipeline, the setup process directly affects weld quality, job safety, and long-term performance. For beginners, the machine may look complicated at first, but the process becomes much easier when it is broken into clear steps.
In this guide, you will learn how to prepare the equipment, check key components, align the pipes, control temperature, and complete the fusion cycle with confidence. If you are looking for professional equipment for field or workshop use, you can explore a reliable butt fusion machine solution designed for different pipe sizes and project needs.
The setup process is not only about turning on a machine. It is about creating the right environment, making sure every part is clean and aligned, and ensuring the heating and hydraulic systems are ready to perform accurately. A well-prepared machine helps reduce waste, avoids weak joints, and saves time on-site. That is why many contractors and distributors choose equipment from experienced manufacturers such as JQ-Fusion, known for durable HDPE pipe welding solutions, stable performance, and technical support for global projects.
1. Understand the Main Parts of the Pipe Fusion Machine
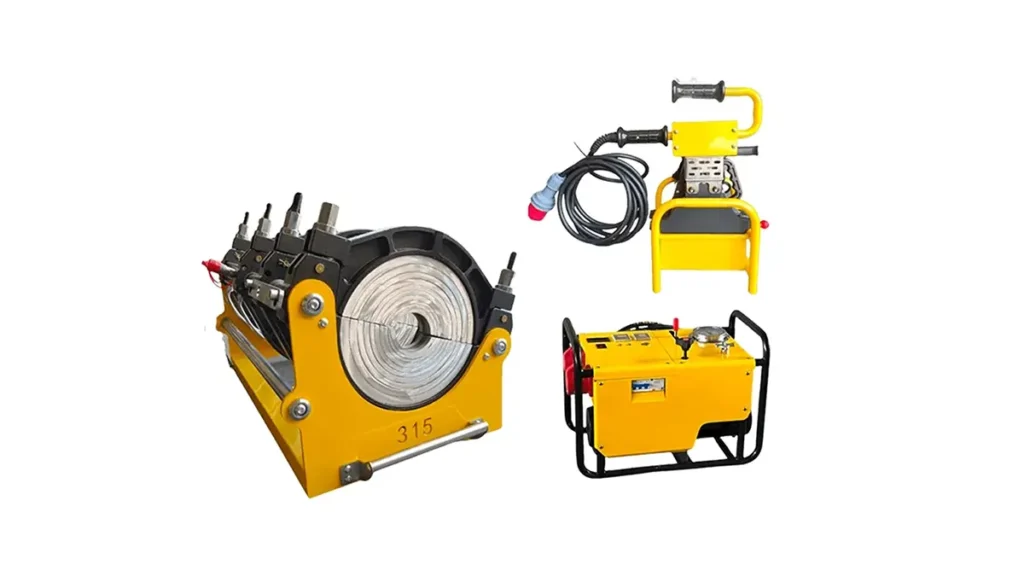
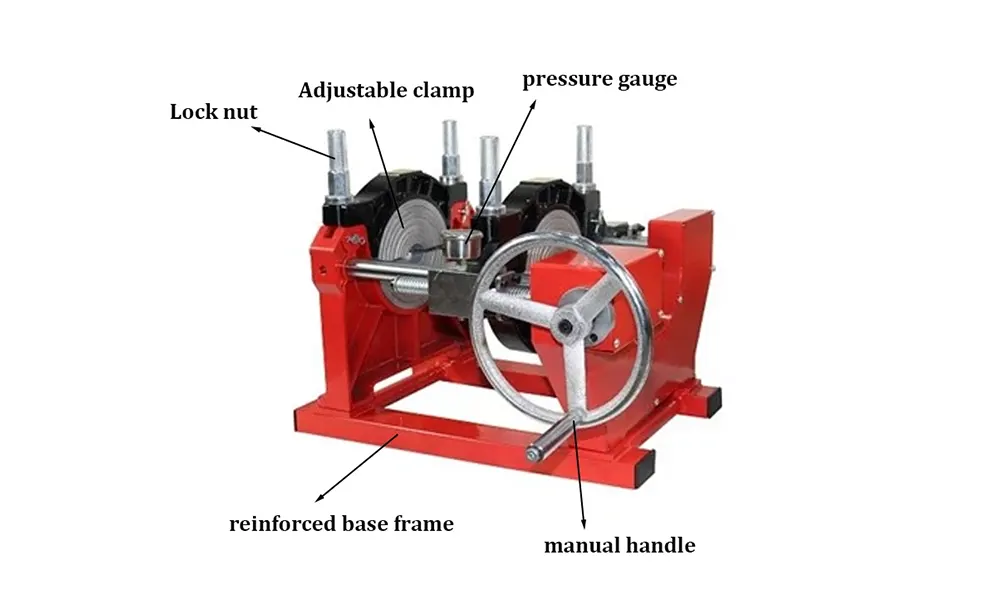
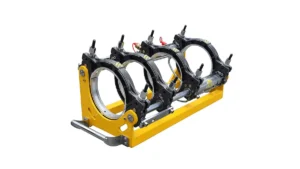
Before setup begins, it is important to know the machine structure. A standard pipe fusion machine usually includes a frame, clamps, facing tool, heating plate, hydraulic unit, control system, and pipe supports. Each component plays an important role in producing a clean, even weld.
Important: A beginner should never rush into welding without first checking every part of the machine. A missing bolt, dirty plate, or unstable hydraulic connection can affect the final fusion result.
The clamps hold the pipe ends in position. The facing tool trims the pipe ends to make them flat and square. The heating plate warms the pipe surfaces to the correct melting condition. The hydraulic system provides pressure during the joining process. When all of these parts work together properly, the machine can create a strong and consistent bond.
2. Choose the Right Location for Setup
The location where you place the machine matters a great deal. A stable, level, and clean surface helps maintain alignment during fusion. Outdoor job sites should be checked for wind, dust, moisture, and uneven ground. Indoors, make sure there is enough working space around the machine for pipe movement and operator access.
Tip: Keep the workspace dry and organized. Dirt, water, and debris can contaminate the pipe ends and weaken the weld.
If the project involves large-diameter pipes, leave extra room for pipe support and safe operator movement. Good setup conditions improve both efficiency and safety. In many professional pipeline projects, crews prefer machines from manufacturers with strong factory capability, strict quality control, and global support because these features help reduce field problems and improve productivity.
3. Inspect the Machine Before Use
Before powering on the equipment, inspect every visible component. Check the frame for damage, make sure the clamps open and close smoothly, and confirm the heating plate surface is clean and intact. Inspect hydraulic hoses, electrical cables, and connectors for wear or leakage.
Also verify that the control unit, pressure gauge, and temperature display are functioning correctly. If your machine is a manual, hydraulic, or CNC automatic model, the inspection process is similar, but the specific controls may differ. Machines manufactured with advanced machining and testing processes usually provide more stable and predictable operation.
Key point: Never ignore small defects. A tiny crack, loose connection, or damaged heating surface can lead to poor fusion quality and costly rework.
4. Prepare the Pipe Ends Carefully
Clean pipe preparation is one of the most critical steps in the fusion process. The pipe ends must be cut square, free from dirt, and protected from moisture or contamination. Wipe the pipe surfaces with a clean lint-free cloth if needed.
Insert the pipes into the clamps and secure them firmly. The pipe ends should extend evenly and stay properly centered. If the pipes are misaligned, the fusion result may be uneven, and the joint may not meet project requirements.
Next, use the facing tool to trim the ends until they are flat and parallel. This step removes oxidation and surface irregularities. After facing, check the gap and alignment again. The two pipe ends should match closely before heating begins.
5. Set the Temperature and Verify the Heating Plate
The heating plate must reach the proper temperature before fusion begins. Different pipe materials and project specifications may require different heating settings, so always follow the equipment manual and site standards. Most operators wait until the temperature stabilizes instead of starting too early.
The heating plate should be clean and evenly heated. If the surface has dirt, burned residue, or uneven temperature distribution, the weld quality may be affected. Many professional machines are designed with accurate temperature control, which helps maintain stable fusion results across repeated jobs.
Reminder: Use protective gloves when handling the heating plate. It can remain hot long after power is turned off.
6. Align the Pipes Precisely
Alignment is one of the most important setup tasks. The two pipe ends must be aligned horizontally and vertically to ensure even pressure during fusion. Misalignment can create stress points in the finished joint and reduce overall strength.
Once the pipes are fixed in the clamps, check whether they line up evenly. Adjust the supports or clamp position if necessary. Some operators use visual checking, while others rely on built-in alignment systems or gauges for higher precision.
When working with larger or heavier pipes, pipe support becomes even more important. Without proper support, the pipe ends may sag or shift during heating and joining. A stable machine setup helps maintain exact positioning throughout the entire cycle.
7. Apply the Right Fusion Pressure
Pressure must be controlled carefully during the fusion process. Too much pressure can force molten material out excessively and weaken the joint. Too little pressure may prevent a proper bond. The correct pressure depends on pipe diameter, material type, wall thickness, and machine specification.
Hydraulic models generally provide better pressure control for medium and large pipelines, while manual models may require more operator attention. Automatic systems can help maintain repeatable settings and reduce human error. This is one reason why many contractors choose machines with strong engineering design and tested performance.
Important: Always follow the recommended pressure values for the pipe and machine you are using. Wrong pressure settings are one of the most common causes of fusion failure.
8. Start the Heating Cycle
Once the pipes are aligned and the heating plate has reached the proper temperature, begin the heating cycle by pressing the pipe ends against the plate with the required pressure. The pipe surfaces should absorb heat evenly and begin to soften.
After the heating time is complete, remove the heating plate carefully and quickly bring the two softened pipe ends together. This transfer must be smooth and fast to avoid heat loss. The machine then maintains joining pressure so the molten surfaces bond into a continuous joint.
During this stage, avoid unnecessary movement. Even small shifts can disturb the fusion interface. A stable machine frame, accurate clamps, and reliable hydraulic control all help produce a cleaner result.
9. Allow the Joint to Cool Naturally
Cooling is part of the fusion process and should never be rushed. The joint needs time to solidify under pressure before the clamps are released. If the pipe is moved too early, the bond may weaken or deform.
The cooling time depends on pipe size, material, and environmental conditions. Follow the procedure recommended by the manufacturer or project standard. During cooling, keep the pipe stable and avoid vibration or external force.
After cooling, inspect the bead around the joint. A smooth, even bead often indicates a properly completed fusion. If the bead is irregular, too small, or excessively large, the setup or process may need to be reviewed.
10. Perform a Final Quality Check
After the joint cools, carry out a careful inspection. Check whether the bead is consistent around the circumference, whether the pipe is straight, and whether the fusion area shows signs of contamination, displacement, or uneven melting.
If the project requires documentation, record the temperature, pressure, heating time, and cooling time. This information is useful for quality control and future reference. In professional pipeline work, traceability is often just as important as the weld itself.
Best practice: Keep a setup log for each project. This helps beginners improve quickly and allows supervisors to identify patterns if a problem occurs.
How Good Equipment Makes Setup Easier
Beginners often find that the machine itself has a major effect on how easy the setup process feels. A well-designed machine offers stable clamps, accurate heating, smooth hydraulic performance, and clear operating controls. These features reduce guesswork and make training easier for new users.
Manufacturers with more than 20 years of industry experience, strict testing procedures, and flexible OEM/ODM capability can provide machines that better match project needs. This is especially important for contractors working on different pipe diameters, voltage requirements, or international standards. Reliable support, fast delivery, and technical training also make a big difference when projects are time-sensitive.
For companies looking to build their own market presence, customization options such as machine color, branding, configuration, and functional upgrades can be valuable. This allows distributors and project teams to use equipment that fits both technical and commercial goals.
Common Mistakes Beginners Should Avoid
Many first-time users make avoidable mistakes during setup. Some forget to clean the pipe ends properly, while others rush through alignment or start heating before the plate is fully stabilized. Another common issue is using the wrong pressure or cooling time.
It is also easy to overlook the importance of pipe support, especially when handling larger pipes. If the pipe shifts during fusion, the joint quality can drop quickly. Beginners should also remember that good results come from careful preparation, not speed alone.
Smart habit: Take a moment before every weld to check cleanliness, alignment, temperature, and pressure. This short pause prevents many costly errors.
Frequently Asked Questions
Q1: How long does it take to set up a pipe fusion machine?
A: Setup time depends on pipe size, machine type, and site conditions. Small jobs may take only a short time, while larger industrial projects require more careful preparation and alignment.
Q2: Can a beginner operate a butt fusion machine safely?
A: Yes, as long as the operator follows the manual, understands the machine parts, and receives proper guidance. Training and careful inspection are essential for safe use.
Q3: Why is pipe alignment so important?
A: Correct alignment ensures even pressure and a uniform weld bead. Poor alignment can create stress, weak spots, and possible joint failure.
Q4: What should I check first before starting fusion?
A: First inspect the machine condition, pipe cleanliness, clamp positioning, heating plate temperature, and hydraulic system status. These checks help prevent mistakes early.
Q5: What kind of machine is best for professional pipeline projects?
A: The best machine depends on the project size and requirements. Hydraulic and CNC automatic machines are often preferred for larger or more demanding jobs because they offer better pressure control and repeatability.
With the right setup, a pipe fusion machine becomes a reliable tool for building strong and durable pipeline systems. Careful preparation, accurate alignment, proper temperature control, and patient cooling all contribute to a successful weld. For beginners, the most important lesson is to move step by step and never skip the basic checks. When the machine is maintained well and the setup process is followed correctly, the final fusion quality will be much more stable and professional.