Installing an automatic welding machine is not just a technical task; it is a process that directly affects weld quality, pipeline safety, and long-term project efficiency. In industries such as water supply, gas distribution, mining, and industrial piping, a correctly installed machine can help operators achieve consistent fusion results, reduce human error, and improve overall productivity. For companies that rely on dependable equipment, choosing a trusted source like butt fusion machine solutions can make installation smoother from the very beginning.
The installation process should always begin with careful preparation. Before unpacking the unit, inspect the shipment for any visible damage and confirm that all accessories, tools, and manuals are included. Since automatic welding machines often have precision components, even minor shipping issues may affect performance. Make sure the installation site is clean, level, dry, and large enough for the machine body, pipe supports, hydraulic system, and control panel. A well-prepared workspace helps reduce vibration, improves alignment, and makes operation safer for the team.
Key point: The machine should be installed on a stable foundation with enough operating space around it. Crowded or uneven work areas can cause alignment errors and reduce welding quality.
1. Understand the Machine Structure Before Installation
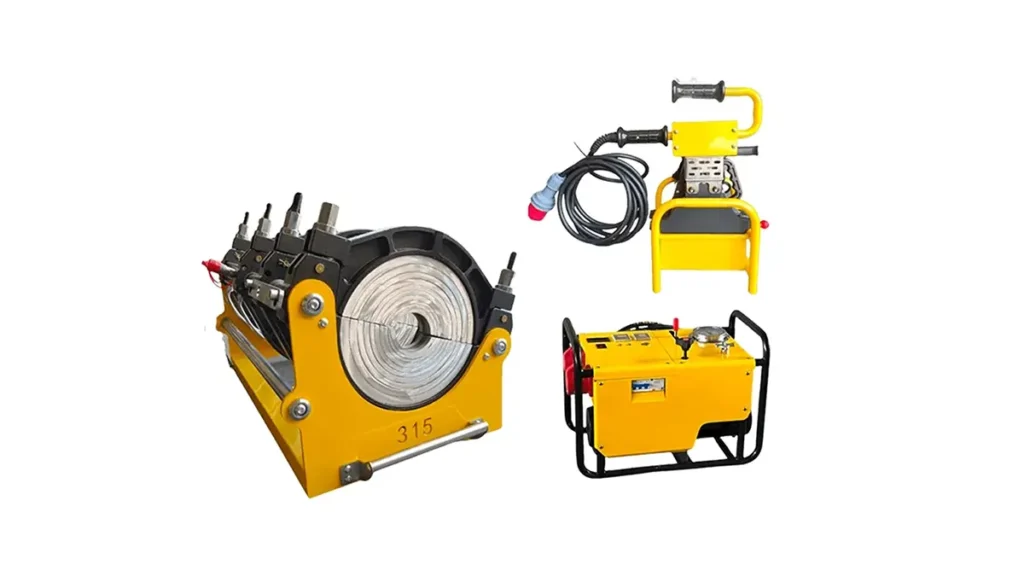
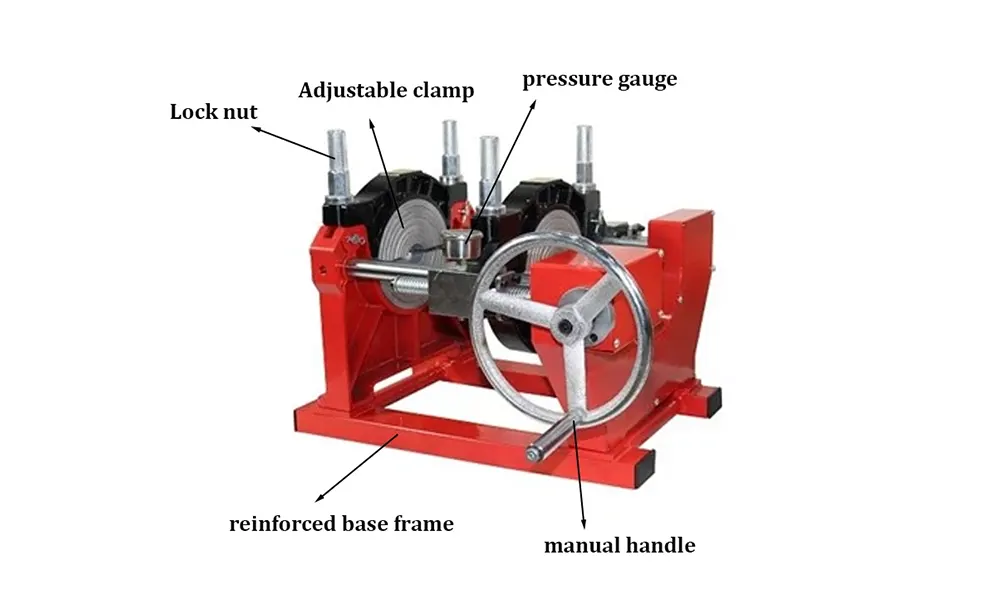
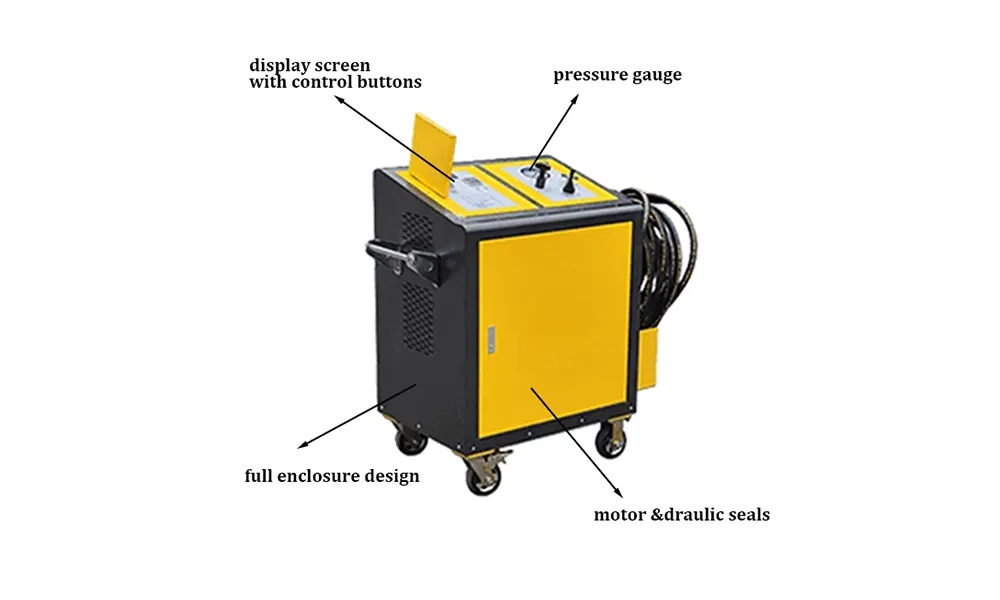
Automatic welding machines generally consist of a frame, clamping system, heating plate, hydraulic station, control system, and trimming unit. Each part must be placed and connected correctly to ensure the machine functions as designed. Operators and technicians should review the machine layout in the manual before starting installation. This is especially important for users who are new to automated pipe fusion, because understanding the component sequence prevents confusion during assembly.
If your project involves different pipe sizes or special site conditions, it is wise to confirm the machine configuration in advance. JQ-Fusion provides a wide range of solutions for various pipeline needs, including manual, hydraulic, and automatic models. You can also learn more about their product support through the official welding equipment platform, where product specifications and customization options are available for international projects.
Installation tip: Check whether the voltage, frequency, and power supply match the machine specification before connection. Electrical mismatch can damage the control system or affect heating accuracy.
2. Prepare the Installation Area and Foundation
A solid foundation is one of the most important factors in automatic welding machine installation. The machine should be placed on a flat surface capable of supporting its weight and resisting movement during operation. If the ground is unstable, the pipe ends may shift during clamping or facing, which can negatively impact the final weld.
For outdoor projects, protect the installation area from rain, dust, and strong wind whenever possible. Moisture can affect electrical components, while dust may enter the control system or interfere with the hydraulic system. In harsh working environments, a temporary shelter or protected work zone is often a smart investment. This is especially useful for large pipeline projects where the machine will be used repeatedly over many days or weeks.
Important: Keep the machine away from water sources, corrosive chemicals, and unstable power lines. A clean and safe environment extends equipment life and reduces maintenance costs.
3. Unpack and Inspect All Components
After the site is ready, carefully unpack the machine and inspect each part. Confirm that the main frame is intact, the clamps move smoothly, the heating plate is not damaged, and all cables and hoses are free from cracks or deformation. It is also a good practice to compare the delivered items with the packing list to avoid missing accessories.
Professional manufacturers such as JQ-Fusion maintain strict quality control before shipment, including temperature accuracy checks, hydraulic pressure stability testing, and clamp alignment inspection. That means installation usually begins with equipment that is already well tested. However, even with reliable factory inspection, the end user should still perform a local check before first use. This step ensures the machine arrives ready for practical welding work.
Inspection checklist
Look for loose bolts, damaged wiring, bent guide rails, and hydraulic leaks. If anything seems abnormal, stop the installation and contact the supplier before continuing. Using a defective component can create additional repair costs and may also compromise operator safety.
Pro tip: Take photos during unpacking and inspection. These records help with installation reports, warranty claims, and future maintenance reference.
4. Assemble the Main Frame and Related Units
When all components have been checked, begin assembling the main frame according to the manufacturer’s instructions. The frame is the core structure that supports the pipe clamping system and ensures correct alignment during fusion. Tighten all bolts evenly, but do not fully lock every fastener until the frame is positioned correctly.
The hydraulic station, control cabinet, trimming unit, and heating plate holder should be installed in their designated positions. Ensure that each part is mounted firmly and that all moving elements operate without obstruction. If the machine includes modular sections, confirm that each module is aligned horizontally and locked securely. Proper assembly improves operational stability and helps reduce wear over time.
Remember: Do not force parts into place. If alignment is difficult, recheck the installation order and base level rather than applying excessive pressure.
5. Connect the Electrical and Hydraulic Systems
Once the frame is assembled, the next step is connecting the electrical system and hydraulic system. Electrical wiring should be completed by qualified personnel who understand local safety standards and machine specifications. Secure every cable connection and ensure all terminals are properly insulated. A clean electrical layout makes troubleshooting easier and reduces the risk of short circuits.
The hydraulic hoses should be connected according to the labels or manual instructions. Before starting the system, check that the oil level is correct and that no leakage is present around the fittings. Hydraulic performance is essential for consistent clamp pressure and smooth movement of machine components. If the pressure is unstable, the welding process may become inaccurate, especially on large-diameter pipes.
Many modern automatic butt fusion machines are designed for efficiency and reliability in demanding environments. JQ-Fusion’s engineering experience and customizable OEM/ODM support help contractors and distributors select machines that match project needs and regional power standards. For users searching for practical industrial welding solutions, the welding equipment manufacturer can provide a useful starting point for technical planning.
Safety note: Always disconnect power before performing electrical adjustments. Never inspect hydraulic leaks with bare hands while the system is pressurized.
6. Calibrate the Machine Before Welding
Calibration is a crucial stage that should never be skipped. The clamp alignment, heating plate temperature, facing tool position, and hydraulic pressure must all be checked carefully before actual welding begins. If the pipe ends are not centered properly, the fusion joint may be weak or uneven. Accurate calibration helps produce smooth, uniform bead formation and improves the overall reliability of the welded joint.
Use test runs without pipes first to observe motion, pressure response, and temperature stability. The heating plate should reach the required temperature evenly, and the control panel should display correct readings. If the machine includes automated programming functions, confirm that all welding parameters are set according to pipe material, diameter, and wall thickness.
Best practice: Record calibration settings for future use. Saving successful parameters helps operators repeat the same results on similar projects.
7. Perform a Trial Welding Cycle
A trial welding cycle is the best way to verify whether installation was successful. During the test, observe how the machine clamps the pipe, trims the ends, heats the surfaces, and completes the fusion cycle. The process should be smooth, stable, and consistent. Listen for unusual noises, watch for vibration, and inspect whether the control panel responds correctly to each command.
After the test weld, examine the joint carefully. A good weld should show proper symmetry, uniform bead appearance, and no visible signs of misalignment or overheating. If problems appear, adjust the machine settings and repeat the test until the result meets project requirements. For operators working on critical pipeline systems, trial welding is an essential quality assurance step.
What to check during the trial
Review temperature accuracy, hydraulic pressure, clamp closing speed, pipe end alignment, and the consistency of the fused joint. These details reveal whether the machine is ready for production use.
8. Train the Operators and Set Maintenance Rules
Even the best-installed machine requires skilled operators. Training should include startup procedures, parameter setting, safety precautions, emergency shutdown steps, and routine cleaning. Operators must understand how to load pipes correctly, how to adjust the machine for different diameters, and how to identify abnormal operating conditions early.
Maintenance rules are equally important. Regularly inspect heating plates, hydraulic oil levels, electrical cables, and clamp surfaces. Clean the equipment after each shift and store it in a dry place when not in use. A well-maintained machine not only performs better but also supports longer service life and lower downtime.
Maintenance reminder: Create a simple checklist for daily, weekly, and monthly inspection. Small preventive actions can avoid expensive production delays later.
9. Why Supplier Support Matters
Installation becomes much easier when the supplier provides technical guidance, clear manuals, and after-sales support. A professional manufacturer can help users choose the right machine model, explain setup procedures, and offer remote assistance if unexpected issues arise. This is one reason many contractors value experienced suppliers with strong global service capability.
JQ-Fusion, for example, focuses on durable and customizable HDPE pipe welding solutions, with a product range that includes hydraulic butt fusion welding machines, automatic butt fusion welding machines, electrofusion welding machines, and multi-angle pipe fitting welding machines. Their long industry experience, OEM/ODM flexibility, and export support make them a practical partner for pipeline companies that need both performance and service reliability.
For project teams planning future purchases, reviewing product details on the butt fusion machine site can help compare configurations, certifications, and support capabilities before installation begins.
Conclusion
Installing an automatic welding machine successfully depends on preparation, precision, and proper support. From selecting a stable site to checking every electrical and hydraulic connection, each step influences welding quality and workplace safety. When calibration, trial welding, and operator training are handled carefully, the machine can deliver stable fusion results and long-term value for pipeline projects. With a professional supplier, strong technical guidance, and routine maintenance, automatic welding equipment can become a highly efficient asset for modern pipe installation work.
Frequently Asked Questions
1. How long does it take to install an automatic welding machine?
Installation time depends on the machine size, site conditions, and available technical staff. A straightforward setup may take a few hours, while a more complex project can require a full day or longer.
2. Can one person install the machine alone?
Small units may be handled by a limited team, but safe installation usually requires at least two people, and electrical or hydraulic work should be performed by qualified technicians.
3. What is the most common installation mistake?
The most common mistake is ignoring foundation leveling or incorrect alignment. These issues can cause poor pipe positioning and reduce weld quality.
4. Why is trial welding necessary?
Trial welding confirms that temperature, pressure, alignment, and motion are all correct before the machine is used on actual project pipes.
5. How can I keep the machine running well after installation?
Follow a regular maintenance schedule, keep the machine clean, monitor hydraulic oil and electrical connections, and train operators to use the equipment properly.