Calibrating an HDPE welding machine is one of the most important steps in achieving strong, clean, and long-lasting joints. Whether you are working on water supply lines, gas distribution networks, mining pipelines, or industrial installations, accurate calibration directly affects weld quality, project safety, and long-term pipeline performance. A machine that is not properly calibrated can cause weak fusion, uneven bead formation, overheating, misalignment, and costly rework. For this reason, operators, contractors, and distributors should treat calibration as a standard part of every welding workflow.
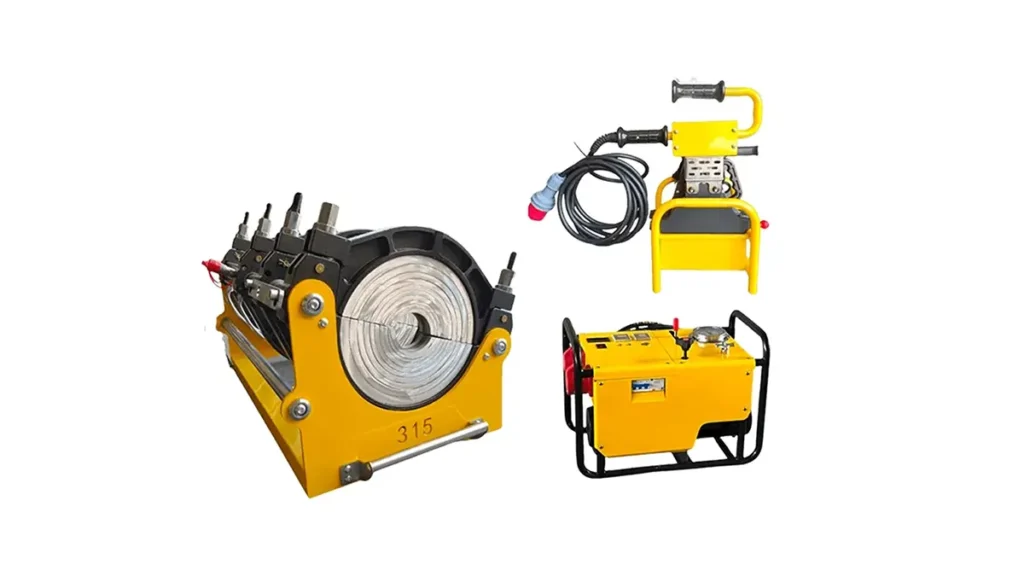
In practical applications, calibration is not just about turning knobs or setting a number on the control panel. It means verifying that the machine produces the correct temperature, hydraulic pressure, clamp alignment, and timing required by the pipe material and diameter. A well-calibrated machine helps ensure that every weld is repeatable and reliable, especially on projects where thousands of joints must perform consistently for many years. For those looking for dependable equipment, a professional butt fusion machine from an experienced manufacturer can make calibration easier and more accurate from the start.
When operators understand how calibration works, they can reduce downtime, improve welding consistency, and avoid unnecessary material waste. This is especially valuable for contractors handling large-diameter HDPE pipelines, where even a small error can affect the entire system. In the sections below, we will explain how to calibrate an HDPE welding machine for accurate and reliable welding, what tools and checks are needed, and how to maintain stable performance over time.
Why Calibration Matters in HDPE Fusion Welding
HDPE fusion welding depends on controlled heat, pressure, and time. If any of these elements are off, the weld may look acceptable on the surface but fail under stress later. Calibration ensures that the heating plate reaches the correct temperature, the hydraulic system applies the proper force, and the clamp system holds the pipe ends in precise alignment. These factors are essential for producing a molecular bond strong enough to perform in demanding field conditions.
Accurate calibration also helps maintain compliance with project specifications and international quality standards. In many pipeline applications, weld logs, inspection records, and machine settings must be documented for quality assurance. A machine that is regularly calibrated makes this process much easier and improves confidence among engineers, site managers, and clients. Reliable calibration is not only a technical requirement but also a professional habit that supports safe and efficient construction.
Important: Even a high-quality machine can produce poor welds if calibration is ignored. Machine quality and operator discipline must work together.
Step 1: Inspect the Machine Before Calibration
Before adjusting any settings, begin with a careful visual and functional inspection. Check the overall condition of the frame, heater plate, hydraulic hoses, electrical connections, and control panel. Look for signs of wear, damage, dust buildup, loose fittings, or oil leakage. A calibration process can only be meaningful if the machine is mechanically sound.
Make sure the machine is positioned on a level surface and that the clamps move smoothly without obstruction. If the machine is unstable, the pipe ends may not align correctly even if the settings are perfect. Also confirm that the power supply matches the machine requirements. Voltage instability can affect heating performance and control accuracy. For automated systems, verify that the software or PLC interface is functioning properly before beginning calibration.
It is also a good practice to clean the machine thoroughly. Dirt, oxidation residue, and moisture may interfere with clamp movement and temperature consistency. Clean surfaces create better contact and help reduce the chance of error during the calibration process.
Step 2: Verify the Heating Plate Temperature
The heating plate is one of the most critical components in an HDPE welding machine. Its temperature must match the pipe material and diameter requirements. If the heater is too cool, the pipe ends will not melt correctly. If it is too hot, the material may degrade, burn, or form an unstable fusion surface.
Use a calibrated external temperature device to compare the plate’s displayed temperature with the actual surface temperature. Check several points across the heating plate, not just the center, because edge zones can sometimes vary slightly. The goal is to confirm that the heating surface heats evenly and accurately. If the reading is inconsistent, the heater sensor or thermostat may need adjustment or servicing.
Tip: Allow enough warm-up time before testing. A heater plate that has not fully stabilized may give misleading readings.
For reliable welding, the machine should maintain a stable temperature throughout the operation, not just during initial heating. This is especially important on site projects where environmental conditions such as wind, low ambient temperature, or humidity may affect heat retention. Stable temperature control is the foundation of a strong fusion joint.
Step 3: Calibrate Hydraulic Pressure Accurately
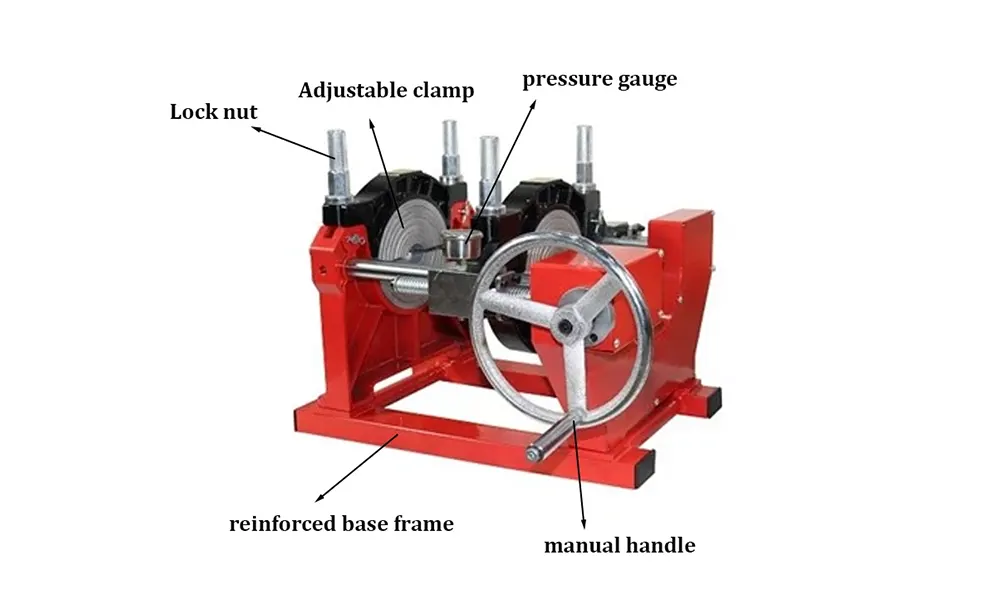
Hydraulic pressure controls the force applied during facing, heating, joining, and cooling stages. Incorrect pressure can lead to excessive bead formation, weak bonding, or deformation of the pipe ends. To calibrate pressure correctly, follow the machine’s technical manual and compare the gauge reading against a verified test instrument if available.
Start by checking whether the pressure gauge returns to zero when the system is idle. Then gradually increase pressure and observe whether the gauge responds smoothly and consistently. Jerky or delayed movement may indicate air in the hydraulic line, worn components, or gauge malfunction. In hydraulic machines, stable and precise pressure is essential for matching fusion parameters to the pipe size and wall thickness.
Operators should also pay attention to how pressure behaves under load. A machine may appear accurate at rest but drift during actual operation. This is why field testing is important. If calibration results do not match expected values, the system should be serviced before use in production welding.
Key point: Pressure calibration is not only about the gauge. The entire hydraulic system must respond consistently under real working conditions.
Step 4: Check Clamp Alignment and Pipe Centering
Alignment is essential in butt fusion welding. If pipe ends are not centered properly, the molten surfaces may not join evenly, resulting in a crooked or weak seam. Before welding, inspect the clamps to ensure they grip the pipe securely and keep both ends on the same axis.
Place the pipe sections in the machine and close the clamps gently at first. Observe whether the pipes are level, centered, and free from excessive movement. Use the facing tool to trim the ends and inspect the shavings. Consistent shavings on both sides indicate good alignment. Uneven shaving patterns often suggest misalignment or clamping imbalance.
Some machines allow fine adjustment of clamp positioning, while others require manual correction using spacers or operator intervention. Either way, the goal is to achieve perfect alignment before the heating stage begins. Once the pipe ends are heated and pressed together, alignment errors become difficult to fix.
Step 5: Confirm Timing for Each Welding Stage
Timing is another critical calibration element. HDPE fusion welding typically includes facing, heating, changeover, fusion, and cooling stages. Each phase must be timed correctly to ensure that the pipe ends are prepared, melted, joined, and stabilized in the proper sequence.
Check that the machine timer or control system reflects the correct values recommended for the pipe diameter, SDR, and material grade. If the timing is too short, the joint may not fully fuse. If it is too long, the pipe surface may overheat or lose structural integrity. Accurate timing helps the operator maintain repeatability across many welds, which is especially important on large projects.
For automatic and CNC systems, verify that the programmed cycle matches the technical requirements of the job. Even though these systems reduce manual error, they still depend on correct parameter setup and regular verification.
Step 6: Run a Test Weld and Evaluate the Result
After calibration, always perform a test weld before full production use. A test weld confirms whether the machine settings produce a strong and visually acceptable joint. Inspect the bead formation, symmetry, and overall appearance. A properly fused joint should show even bead roll, consistent pressure marks, and no obvious signs of burning or separation.
If possible, perform destructive or non-destructive testing according to project requirements. This may include bend testing, peel testing, or visual inspection by a qualified technician. Test results provide the best confirmation that the machine is calibrated correctly and that the fusion process is under control.
Testing also helps identify subtle problems that may not be obvious during setup. For example, a temperature reading may look correct, but the actual fusion result may reveal poor heat transfer or pressure instability. Test welding is therefore a practical bridge between theoretical settings and real-world performance.
Best practice: Record all test weld parameters so they can be reused on future jobs with similar pipe specifications.
How Manufacturer Quality Supports Calibration Accuracy
The quality of the welding machine itself has a major impact on how easy calibration will be. Machines built with precise machining, stable hydraulic systems, and reliable control components tend to hold settings better and deliver more consistent results. This is one reason experienced manufacturers with strong quality control are valued in global pipeline projects.
JQ-Fusion, for example, focuses on butt fusion solutions for HDPE pipe welding applications and supports manual, hydraulic, and CNC automatic models for different project needs. Their products are designed for stable performance, and each machine is tested for temperature accuracy, hydraulic pressure stability, and clamp alignment before delivery. This kind of manufacturing discipline gives operators a stronger starting point for accurate calibration.
Projects also benefit from customization. Voltage, machine size, color, and functional configurations can all influence how a welding machine fits into a specific work environment. When a machine is tailored to the job, calibration becomes simpler and more reliable because the equipment is aligned with actual field requirements.
For users who need a machine with dependable support and proven production capability, it is worth evaluating suppliers with long industry experience and strong technical service. Consistent manufacturing standards reduce the number of variables that can affect calibration success.
Maintenance Habits That Protect Calibration
Calibration is not a one-time activity. Machines can drift over time because of wear, transport, vibration, temperature changes, and repeated field use. To keep calibration accurate, implement a regular maintenance schedule. Clean the heater plate, inspect hydraulic oil levels, verify sensor performance, and check clamp wear before each major project.
When a machine is used frequently, small deviations can build up gradually. Daily checks may catch problems early, while monthly or project-based calibration reviews help maintain long-term consistency. Proper storage is also important. Keep the machine in a dry, protected location to avoid corrosion, contamination, and electrical issues.
Training operators is equally important. Even well-calibrated equipment can be misused if the team does not understand the process. Skilled operators know how to adjust settings, recognize abnormal readings, and react quickly when conditions change. Good maintenance and good training work together to preserve accuracy.
Reminder: Calibration confidence increases when the machine, the operator, and the maintenance routine all work together.
Common Mistakes to Avoid During Calibration
One common mistake is assuming factory settings are always correct for every project. Different pipe sizes, wall thicknesses, and ambient conditions may require adjustment. Another mistake is skipping verification with external measuring tools. Relying only on the machine display can hide sensor errors or drift.
Operators also sometimes rush the heating or cooling cycle to save time. This can weaken the weld and reduce the life of the pipeline. In addition, failing to inspect the hydraulic system before calibration can lead to misleading pressure readings. If the system contains air or worn parts, the gauge may appear acceptable while actual fusion force remains unstable.
A final mistake is ignoring documentation. Keeping calibration records, test weld results, and maintenance notes makes it much easier to trace issues later and improve future jobs. Accurate records support professional welding management and quality control.
Practical Benefits of Accurate Calibration
When an HDPE welding machine is calibrated correctly, the benefits are immediate and long term. Welds become more uniform, project productivity improves, and repair costs drop. Operators spend less time correcting mistakes and more time completing installation work efficiently. In large-scale pipeline projects, this can save significant labor and material costs.
Accurate calibration also improves confidence in the finished pipeline system. Whether the line carries water, gas, slurry, or industrial media, the quality of each joint affects overall performance. A properly calibrated welding machine helps ensure that the fusion process is stable, repeatable, and suitable for demanding field applications.
For contractors and distributors, this reliability also strengthens reputation. Customers are more likely to trust equipment that performs consistently and supports smooth project execution. That is why calibration should be considered a core part of professional welding practice rather than a secondary task.
FAQ
Q1: How often should an HDPE welding machine be calibrated?
Calibration should be checked before major projects, after transport, after repairs, and on a regular maintenance schedule. Machines used frequently should be verified more often.
Q2: Can I calibrate the machine without external measuring tools?
It is not recommended. External tools help confirm whether the displayed temperature and pressure are accurate. Verification is important for reliable welding.
Q3: What is the most important part of calibration?
All parts matter, but temperature, pressure, and alignment are usually the most critical because they directly affect weld quality.
Q4: Why does the same machine produce different weld results?
This may happen because of poor calibration, worn components, inconsistent power supply, operator error, or changing environmental conditions.
Q5: How can I improve calibration stability over time?
Use regular maintenance, keep records, train operators properly, and choose a machine from a manufacturer with strong quality control and technical support.
Conclusion: Accurate HDPE welding machine calibration is essential for producing strong, reliable, and repeatable fusion joints. By inspecting the machine, verifying temperature and pressure, checking alignment, confirming timing, and testing the final weld, operators can achieve stable results in demanding pipeline projects. Good calibration, combined with proper maintenance and professional equipment, creates the foundation for long-term welding success.