
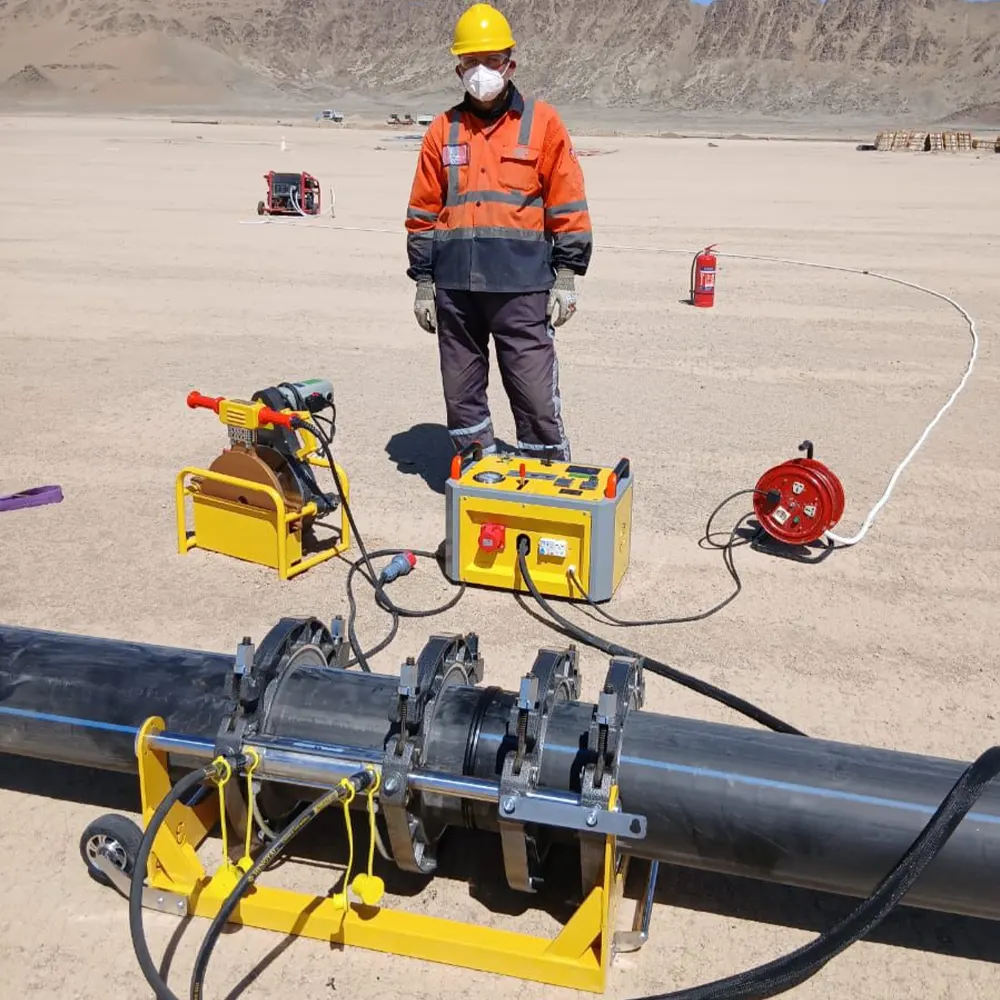
Ensuring a reliable and leak-free water supply system is a critical task for engineers and contractors. Among various piping materials, High-Density Polyethylene (HDPE) has become a preferred choice due to its flexibility, corrosion resistance, and long service life. The key to unlocking these benefits lies in the quality of the joints, making proper HDPE pipe welding not just a step, but the cornerstone of a durable system.
Understanding HDPE and Welding Fundamentals
HDPE is a thermoplastic polymer known for its high strength-to-density ratio. For water supply applications, its resistance to chemical and environmental stress cracking is invaluable. The primary method for joining HDPE pipes is heat fusion, which creates a permanent, homogeneous, and leak-proof joint that is as strong as the pipe itself.
The most common technique for straight pipe runs is butt fusion welding. This process involves heating the ends of two pipe sections simultaneously and then joining them under controlled pressure. Success depends on four critical parameters: temperature, pressure, time, and alignment. Mastering these is essential for a reliable weld.
Step-by-Step Guide to Butt Fusion Welding
Following a meticulous procedure is non-negotiable for achieving consistent results. Here is a detailed breakdown of the standard butt fusion process.
1. Preparation and Setup
Begin by ensuring the work area is clean, dry, and safe. Inspect the pipe ends for damage, dirt, or moisture. Securely clamp both pipe sections into the butt fusion machine, ensuring they are properly aligned. The machine’s clamps must hold the pipes firmly to prevent movement during the welding cycle.
2. The Heating Phase
Insert the heating plate between the pipe ends. Apply the specified interfacial pressure to ensure full contact between the pipe ends and the plate. Maintain this pressure for the heating time specified by the pipe manufacturer, which is based on the pipe’s diameter and wall thickness (DR). A molten bead will form around the pipe circumference.
3. The Changeover and Fusion Phase
This is the most critical and time-sensitive step. Quickly remove the heating plate and immediately bring the two molten pipe ends together by applying the specified fusion pressure. Any delay can cause the material to cool below the optimal welding temperature, resulting in a weak joint.
4. Cooling Under Pressure
Hold the joint under fusion pressure for the initial cooling period, then reduce to a lower holding pressure for the remainder of the cooling time. Do not disturb or stress the joint during cooling. The joint must cool naturally to room temperature to develop its full strength.
Common Welding Defects and How to Avoid Them
Even with careful procedure, issues can arise. Recognizing and preventing common defects is crucial for quality assurance.
- Cold Weld: Caused by insufficient heating temperature, short heating time, or excessive fusion pressure. The joint appears uneven and has low strength. Prevention: Strictly adhere to the manufacturer’s recommended parameters.
- Overheating/Burning: Results from excessive temperature or prolonged heating time, causing material degradation. Prevention: Use a calibrated heating plate and timer.
- Misalignment: Pipes are not properly aligned in the clamps, creating a mismatch and stress concentration. Prevention: Double-check alignment before facing and heating.
The Role of Quality Welding Equipment
The reliability of the welding process is directly tied to the precision and stability of the equipment used. A high-quality butt fusion machine provides accurate temperature control, consistent hydraulic pressure, and robust clamping force. Manufacturers like JQ-Fusion, with over two decades of experience, design machines that ensure repeatable welding success across diverse global projects, from municipal water mains to industrial installations. Investing in professional-grade equipment from a trusted supplier is an investment in the longevity of the entire pipeline system.
Best Practices for a Reliable Water Supply System
Beyond the welding steps themselves, several overarching practices guarantee system integrity.
Operator Training & Certification: Welders must be formally trained and certified. Skill and experience are irreplaceable factors in reading weld beads and adjusting for site conditions.
Material Traceability: Use pipes and fittings from the same resin lot or compatible manufacturers. Keep records of all materials used. For comprehensive solutions, exploring the range of professional butt fusion machine options can be part of this systematic approach.
Procedure Qualification: Before starting production welding, qualify your procedure by making sample welds and performing destructive tests (e.g., tensile, bend) to confirm the parameters are correct for the specific material.
Visual Inspection & Documentation: Every weld should be visually inspected for a uniform bead shape and proper size. Documenting each weld’s location, operator, date, and parameters creates a valuable history for the asset.
Frequently Asked Questions (FAQs)
1. Can HDPE pipes be welded in cold or wet weather?
It is not recommended. Cold temperatures can cause the material to heat unevenly and cool too quickly, compromising weld integrity. Moisture on the pipe ends will turn to steam during heating, creating voids in the weld. Always weld in a controlled, dry environment, and consider using protective shelters.
2. How long does a butt fusion weld need to cool before the pipe can be handled or backfilled?
The full cooling time is critical and varies by pipe diameter and wall thickness. A general rule is to allow a minimum cooling time of 1.5 minutes per millimeter of pipe wall thickness under pressure, followed by additional natural cooling. Consult the pipe manufacturer’s charts for exact times. Never rush this step.
3. What is the main difference between a manual and a fully automatic butt fusion machine?
Manual machines require the operator to control the heating and fusion pressures and times based on gauges and timers. Fully automatic machines, often CNC-controlled, are programmed with the weld parameters. They automatically execute the entire heating, changeover, and cooling cycle with precise repeatability, reducing human error and producing more consistent welds, especially for critical projects.
4. Is the weld bead on the inside of the pipe a problem for water flow?
The internal bead is a natural result of the fusion process. For water supply systems, the slight flow restriction is usually negligible. However, for applications requiring minimal friction loss, the bead can be removed using a bead profiling tool after welding, provided the system design allows for it.
5. How do I know if my welding parameters are correct?
Parameters are primarily determined by the pipe’s Diameter, Dimension Ratio (DR/SDR), and material grade (PE80, PE100). Always refer to the technical data sheets provided by the pipe manufacturer. These sheets provide precise tables for heating time, pressure, and cooling time. Never use parameters from a different pipe brand or specification.



